Nail Art Designs: A Complete Guide to Styles, Tools, and Techniques
What are nail art designs?
Nail art designs are decorative techniques applied to fingernails and toenails using polish, gel, acrylics, and embellishments like glitter or rhinestones. The trend traces back to 1980s New York, where nail technicians started experimenting with bold colors and patterns. Since then, it has exploded on social media, with millions of people sharing their latest manicures across Instagram and TikTok.
Whether you prefer a classic French tip or a wild animal print, there is a nail art style for every taste and skill level. You can get your nails done at a salon or try most of these designs at home with the right supplies.
Popular nail art designs to try
French nail art
The French manicure remains one of the most requested nail art designs worldwide. The classic version uses a milky pink base with white tips. Modern twists include gold or silver tips, inverted French designs where you paint the lunula one color and the rest of the nail another, and V-shaped French tips that add geometric edge to the traditional look.
Caviar nails
Caviar nails use tiny spherical beads applied over wet polish to create a textured, three-dimensional finish. The beads resemble fish eggs, which is where the name comes from. This style works well for special occasions and pairs nicely with neutral base colors like black, nude, or deep burgundy.
Glitter and confetti nails
Glitter nail art designs range from subtle shimmer to full-coverage sparkle. You can apply loose glitter over a tacky top coat, use pre-mixed glitter polishes, or place individual confetti pieces for a customized look. Layer different glitter sizes for extra depth and dimension.
Velvet nails
Velvet nails get their soft, fabric-like texture from tiny fibers called flocking powder. You apply the powder over wet polish and let it set. The result looks and feels like suede or velvet. Dark jewel tones like emerald, sapphire, and burgundy look particularly striking with this technique.
Animal print nails
Leopard spots, zebra stripes, and tiger patterns bring bold energy to your manicure. You can paint animal prints freehand with a thin brush or use nail stamps for cleaner lines. Try the print on one or two accent nails while keeping the rest solid for a balanced look.
Striped nails
Striped nail art designs use thin lines of contrasting colors for a clean, graphic effect. Striping tape makes this technique beginner-friendly since you lay down the tape, paint over it, and peel it away for crisp edges. Vertical stripes elongate shorter nails, while horizontal stripes work better on longer nail beds.
Floral nails
Flowers work on every nail shape and length. You can paint small daisies with a dotting tool, create roses with a thin brush, or apply floral nail stickers for a quicker result. White flowers on a nude base give a soft, bridal look. Bold tropical flowers on bright backgrounds suit summer.
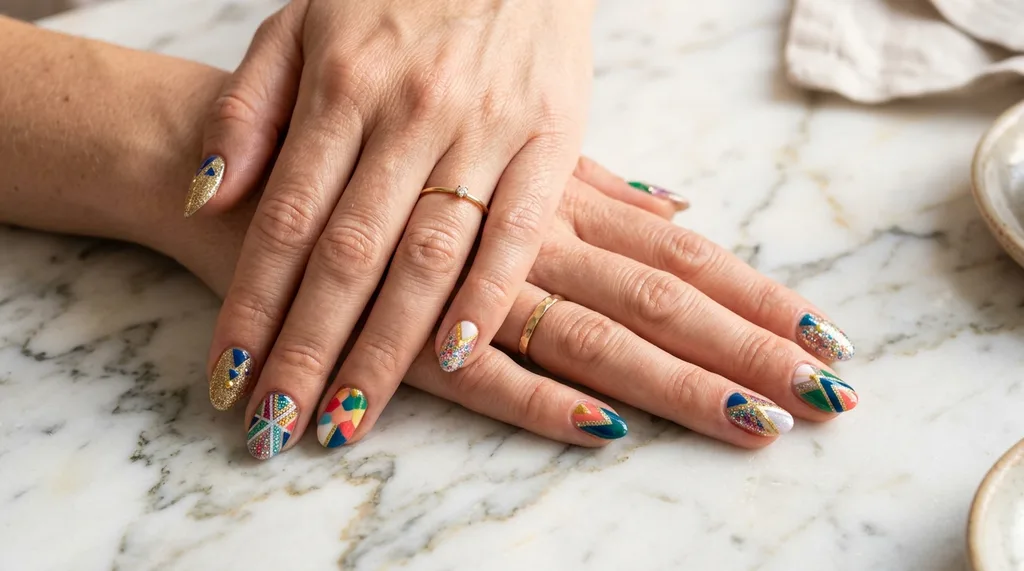
Geometric nails
Triangles, chevrons, color blocks, and abstract shapes define geometric nail art. Masking tape helps you create sharp lines between color sections. Negative space designs, where parts of the bare nail show through, add a modern twist to geometric patterns.
Accent nails
The accent nail approach highlights one finger, usually the ring finger, with a different color or design while keeping the other nails uniform. This is a great entry point for anyone new to nail art designs because it limits the detailed work to a single nail.
Chrome and mirror nails
Chrome nails use a finely ground metallic powder called chrome pigment, rubbed over cured gel polish to create a mirror-like finish. The effect works with any base color. Silver chrome over black creates a liquid metal look. Gold chrome over nude gives a warm, luxe finish. Rose gold chrome has become one of the most popular nail art designs on social media in recent years.
Acrylic vs gel nails: which is better?
Acrylic and gel are the two main methods for building sculpted nail extensions. Each has distinct advantages depending on your lifestyle and preferences.
| Feature | Acrylic nails | Gel nails |
|---|---|---|
| Material | Liquid monomer + powder polymer | Pre-mixed gel cured under UV/LED lamp |
| Drying method | Air-dries on contact | Requires UV or LED lamp to harden |
| Flexibility | Rigid, more prone to snapping | Flexible, bends rather than breaks |
| Appearance | Slightly thicker, visible nail line | Thinner, more natural-looking |
| Maintenance | Fillable at home with a file | Must return to salon for fills |
| Longevity | 15 to 20 days between fills | 2 to 3 weeks between fills |
| Removal | Soak in acetone | File down + acetone soak |
| Cost (average) | $35 to $60 per set | $45 to $75 per set |
Some salons combine both methods by building the nail with acrylic and sealing it with a thin gel layer for extra shine and durability. These hybrid nails, sometimes called porcelain nails, offer the strength of acrylic with the glossy finish of gel.
Essential tools for nail art
You do not need a professional kit to start experimenting with nail art designs at home. Here are the basics that cover most techniques.
- Cuticle remover and pusher — Clean cuticles before any polish application. Healthy cuticles prevent hangnails and give polish a smoother surface to adhere to.
- Nail clippers and file — Shape your nails before painting. Files come in different grits: use 180-grit for natural nails and 100-grit for acrylics.
- Nail hardener — Apply a strengthening treatment if your nails chip or break easily. Look for formulas with keratin or calcium.
- Base coat — A base coat improves polish adhesion and prevents staining from dark colors. Apply one thin layer and let it dry before adding color.
- Detail brushes — Thin liner brushes and angled brushes give you control for French tips, stripes, and freehand designs.
- Dotting tools — These double-ended tools create perfect polka dots, flower petals, and dot-based patterns. A bobby pin works as a DIY alternative.
- Top coat — Seal your nail art with a glossy or matte top coat. Swipe the tip of the nail (called capping the free edge) to prevent chipping.
- Nail art embellishments — Rhinestones, caviar beads, foils, striping tape, and glitter give your designs extra texture and dimension.
- Quick-dry drops — Cut drying time significantly. Apply two to three drops per nail after your final coat.
- Acetone nail polish remover — Dip-style removers with a sponge insert save time and cotton compared to traditional bottles.
How to paint your nails for longer-lasting results
A few simple techniques can extend the life of your nail art designs by several days.
- Start with clean, dry nails. Remove any old polish and wipe nails with rubbing alcohol to eliminate oils that prevent adhesion.
- Apply thin coats. Two thin layers of color dry faster and last longer than one thick coat. Wait 60 to 90 seconds between layers.
- Wrap the tips. Brush polish along the free edge of each nail to seal the color and prevent tip peeling.
- Use a white base for bright colors. A single coat of white polish underneath makes neon and pastel shades pop without needing extra layers.
- Try the tape method for two-tone designs. Apply your first color and let it dry completely. Place masking tape in your desired pattern, then apply the second color. Remove the tape while the polish is still slightly wet for the cleanest lines.
- Use stencils for half-moon designs. Paper hole reinforcement stickers make perfect guides for painting half-moon or lunula designs at the base of the nail.
Frequently asked questions
Do nails need to breathe between manicures?
No. Nails are made of dead keratin cells and do not require air. However, if your nails were damaged during removal, taking a break allows you to focus on hydration and repair with cuticle oil and a strengthening treatment.
How long do nail art designs typically last?
Regular polish lasts 5 to 7 days with a good top coat. Gel polish holds up for 2 to 3 weeks. Dip powder and acrylic nails can last 3 to 4 weeks before needing a fill or refresh.
What is the easiest nail art for beginners?
Polka dots and stripes are the simplest nail art designs to start with. Use a dotting tool or bobby pin for dots, and striping tape for straight lines. Both techniques require minimal freehand skill and still look polished.
How can I make my nail art last longer?
Always start with a base coat for adhesion. Seal your design with a top coat and cap the free edge of each nail. Avoid soaking your hands in water for extended periods, and wear gloves when cleaning or washing dishes.
What is the difference between gel and acrylic nails?
Acrylic nails use a liquid monomer mixed with powder polymer that air-dries into a hard shell. Gel nails use a pre-mixed formula that hardens under a UV or LED lamp. Gel nails look more natural and are more flexible, while acrylics are stronger and easier to repair at home.


Pingback: Délices Pastel de Chanel Spring 2023: Eyeshadow, Powder & How to Wear It